Wednesday, December 21, 2011

Monster Cookies


For as long as I can remember, we have always had Monster Cookies around Christmas.  My mom got the recipe from one of her college classmates.  As kids, we would always pull our chairs up to the counter to help stir when my mom made them.  Now, I make the cookies each year to carry on the tradition.


All the ingredients...except the oats (oops!)

Almost done!!


MONSTER COOKIES

12 eggs
1 pound butter
2 pounds light brown sugar
4  cups white sugar
1 Tablespoon light corn syrup
8 teaspoons baking soda
3 pounds creamy peanut butter
14 cups old-fashioned oats
1 pound chocolate chips (12 oz. ok)
1 pound M&Ms

Mix in order given.  Drop by large Tablespoons on a lightly greased pan.  Bake 10-12 minutes at 350-375 degrees F.

Makes 20 dozen

**I use a smaller cookie scoop and bake mine at 365 degrees F for 8 minutes.  They will appear undercooked when they first come out of the oven, but will firm up as they cool.

**Last time I counted, I got 605 cookies from this recipe!

~Posted by Karen

Sunday, November 13, 2011

Pumpkin Pie


It's almost time for Thanksgiving and you know what that means....pumpkin pie!  I actually haven't tried this pie myself - I don't like anything with pumpkin, nutmeg, or really any of the traditional Thanksgiving flavors.  However, it's the recipe that my grandma always makes for our Thanksgiving dinner, and my dad asked me to make it.  I have no idea where the recipe came from - she probably got it off the canned pumpkin label many years ago!

Mix pumpkin and sugar; add spices.


Add milk and eggs.


Pour into deep dish pie crusts and bake!


PUMPKIN PIE

2 cans pumpkin
2 cups sugar
3 teaspoons pumpkin pie spice
1 teaspoon salt
1/2 - 1 teaspoon nutmeg
2 cans evaporated milk
4 eggs, beaten
2 deep dish pie crusts

Mix the pumpkin and sugar; add spices and mix well.  Add milk, then eggs.  Bake in 425 degree oven for 15 minutes, then reduce temperature to 350 degrees and continue baking for an additional 45 minutes.  Keep an eye on the pie towards the end of the baking time, as you may need to cover it to prevent the crust from getting too brown.

Makes 2 deep dish pies
~Posted by Karen

Thursday, October 27, 2011

Daring Bakers' Challenge: Povitica

The Daring Baker’s October 2011 challenge was Povitica, hosted by Jenni of The Gingered Whisk. Povitica is a traditional Eastern European Dessert Bread that is as lovely to look at as it is to eat!


I had never heard of povitica until this challenge, but I was excited to try it!  I chose to make the traditional version, with a walnut filling, but other popular fillings include fruits and cream cheese.  The recipe was simple for the most part, but I did find it difficult to roll up the dough with the filling, as the dough was thin, and began to tear.  Povitica makes a delicious breakfast or dessert, and I definitely plan to make this again some day!

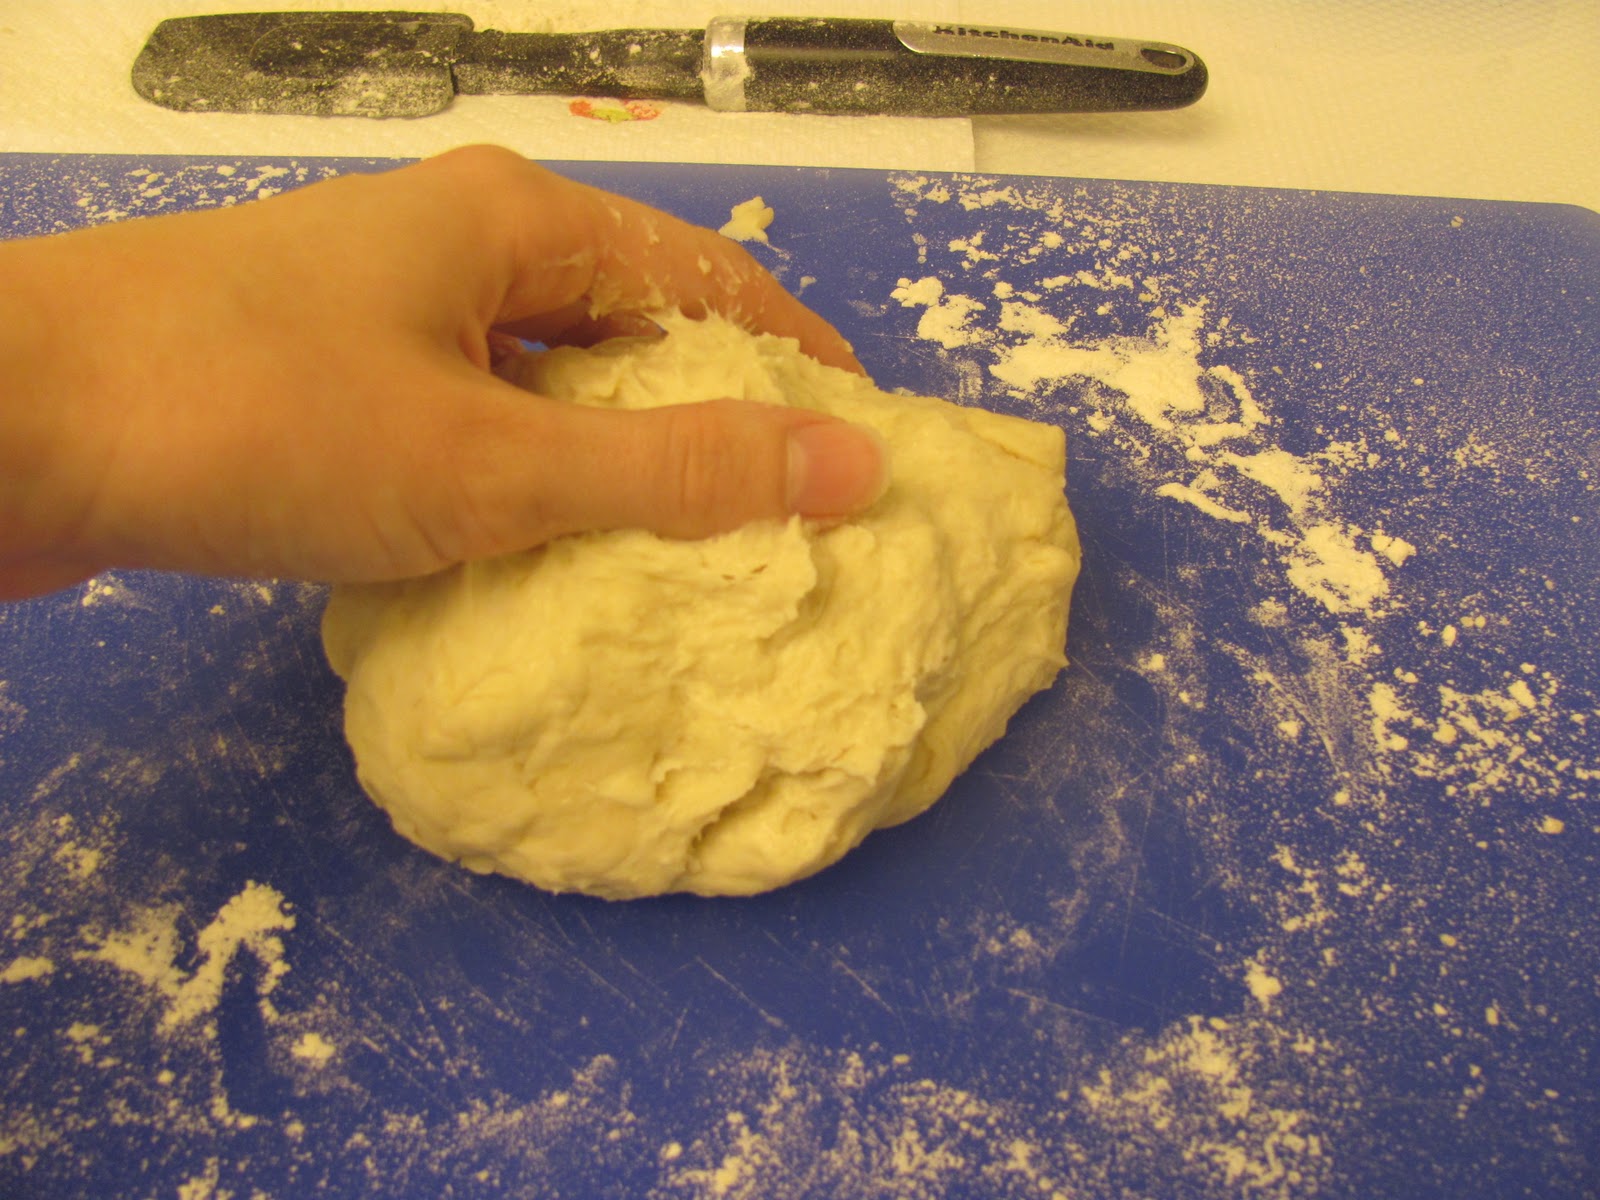
Mix the dough and allow to rise

Make the walnut filling

Spread filling over rolled out dough

Roll up both sides of the dough with filling, meeting at the center

Fold the top and bottom of the rolled up dough, forming a seam

Place dough in oiled pan and brush with brewed coffee

Yum!

Povitica
Makes one loaf

Dough
1/2 tsp sugar
1/4 tsp flour
2 tbsp warm water
1 1/2 tsp active dry yeast
1/2 cup milk
3 tbsp sugar
3/4 tsp salt
1 egg, beaten
1 tbsp melted butter
2 cups flour, sifted

Filling
1 3/4 cups walnuts
1/4 cup milk
1/4 cup butter
1 egg yolk
1/4 tsp vanilla
1/2 cup sugar
1/4 tsp cocoa powder
1/4 tsp cinnamon

Topping
2 tbsp strong brewed coffee
1 1/2 tsp sugar
Butter

1. Activate yeast by stirring 1/2 teaspoons sugar, 1/4 teaspoon flour and yeast into 2 tablespoons warm water.  Cover with plastic wrap and allow to stand for 5 minutes.

2. Heat 1/2 cup milk in saucepan, stirring constantly, until just below boiling.  Allow to cool slightly.

3. Mix the scalded milk, 3 tablespoons sugar, and 3/4 teaspoon salt until combined.  Add the beaten egg, yeast mixture and 1/2 cup flour.  Stir mixture, gradually adding the remaining flour, until dough is well combined.

4. Knead dough on floured counter top until smooth and not sticky.  Place dough in a lightly oiled bowl and cover with plastic wrap.  Allow dough to rise in a warm place for about an hour and a half.  Dough should double in size.

5. Make filling by grinding the walnuts and sugar in a food processor, until nuts are finely ground.  Watch carefully, to prevent nuts from turning into a paste.  Mix the nut and sugar mixture with cinnamon and cocoa powder.  Heat the milk and butter to boiling, and pour over the nut mixture.  Add eggs and vanilla, and mix well.  Allow mixture to cool before spreading onto dough.

6. Place dough on well floured surface, and roll out to 10-12 inches in diameter.  Spoon melted butter on top, and carefully stretch dough with hands or rolling pin, until it is thin enough to see the surface underneath. 

7. Carefully spread filling over the dough.  Carefully roll both sides of the dough towards the center, like a scroll.  Fold the top and bottom of the scroll, so that they meet.  Place dough into greased loaf pan, seam side down.

8. Make topping by mixing 2 tablespoons strong brewed coffee with 1 1/2 teaspoons sugar.  Brush topping over loaf.  Cover loaf with plastic wrap and allow to rest for 15 minutes

9. Preheat oven to 350 F.  Remove plastic wrap from pan, and bake dough for about 15 minutes.  Turn down heat to 300 F and continue baking for another 45 minutes.  

10.  Allow dough to cool in pan, on a wire rack, for 30 minutes, before removing from pan.  This dough is heavy, and will collapse if removed from pan when too warm.  


-Posted by Jennifer  

Saturday, October 22, 2011

Andes Mint Cupcakes


I love mint almost as much as I love chocolate...so I knew these cupcakes would be delicious.  My brother is not a huge fan of chocolate, but he came home from work concerned that I had given all the cupcakes away - he had been thinking about them his entire shift! 


Prepare the cupcakes

Make the ganache and fill the cupcakes when they come out of the oven.

Ice with mint cream cheese frosting and top with leftover ganache and an Andes mint!


Recipe from Your Cup of Cake.

~Posted by Karen

Monday, October 10, 2011

Pumpkin Roll


It's finally my favorite time of year again!  I love everything about fall... the cooler weather, the changing leaves, and most of all, I love pumpkin flavored desserts!  This pumpkin roll is a simple but delicious way to celebrate the season.

Mixing the cake batter

Spreading cake batter into prepared jelly roll pan


Spreading cream cheese filling over cool cake

Pumpkin roll!


Pumpkin Roll

¾ cup all-purpose flour
½ tsp baking powder
½ tsp baking soda
½ tsp cinnamon
½ tsp cloves
¼ tsp salt
3 eggs
1 cup granulated sugar
2/3 cup canned pumpkin
Powdered sugar

Filling
8 ounces cream cheese, at room temperature
1 cup powdered sugar
6 tablespoons butter, softened
1 tsp vanilla extract

1. Preheat oven to 375°F.  Prepare a jelly roll pan by lining with greased and floured parchment paper. 
2. Mix together flour, baking soda, baking powder, cinnamon, cloves and salt.  Beat eggs and granulated sugar in a separate bowl, then beat in pumpkin.  Stir in the flour mixture until well combined.  Spread mixture into jelly roll pan.
3. Bake cake for 13-15 minutes.  Top of cake should bounce back if touched.  Turn cake out onto a kitchen towel, sprinkled with powdered sugar.  Peel off parchment paper and roll up cake with towel.  Allow the cake to cool while rolled up with towel.
4. Prepare filling by beating together cream cheese, powdered sugar, butter and vanilla extract.  Filling should be fluffy and easy to spread. 
5. Once cake has cooled, unroll, and spread cream cheese filling over cake.  Reroll the cake.  Refrigerate for at least 30 minutes to allow filling to set.    Sprinkle finished cake with powdered sugar.


-Posted by Jennifer


Sunday, October 2, 2011

Cookies and Cream Cupcakes


When I saw this recipe on Bakerella I was excited to try it.  Then I remembered a cookies and cream cake I made several years ago that I didn't really care for, and had second thoughts about these cupcakes.  But in the end, I decided to give them a try - and I'm so glad I did!  They are super moist, and even though I'm not normally a fan of buttercream icing, the Oreo crumbs that are mixed in make all the difference.  I ended up with an extra package of Oreos and would have made a second batch if our brother hadn't found them in the pantry!

Recipe from Bakerella - get it here!

~Posted by Karen

Wednesday, September 28, 2011

Daring Bakers' Challenge: Croissants

The Daring Bakers go retro this month! Thanks to one of our very talented non-blogging members, Sarah, the Daring Bakers were challenged to make Croissants using a recipe from the Queen of French Cooking, none other than Julia Child!


I was very excited to see the challenge this month!  One of my favorite things about traveling in France is starting my mornings with a fresh croissant.  Good croissants are hard to find where I live, so I always wanted to learn to make my own.  These croissants are flaky and buttery, and made the perfect breakfast!  Unfortunately, it's a long process, and I probably won't have time to make them again any time soon, but I'm glad to finally have learned how to make these quintessential French pastries.

Kneading the dough

After rolling out and folding the dough for the first time


Butter was spread onto the rolled out dough


More folding


Croissants rising before baking


Yum!


Sarah has great step-by-step directions for this recipe, along with pictures, at http://thedaringkitchen.com/recipe/fresh-fluffy-french

-Posted by Jennifer


Sunday, September 18, 2011

Fudge Rounds


When we were kids we always brought our lunches to school...and we always got a treat in our lunchbox.  Little Debbie Fudge Rounds were one of my favorites.  I haven't had a real fudge round in years, but when I came across this recipe I knew I had to try them!

Make the cookies


Mix up the filling and make sandwiches


Drizzle the topping over the cookie sandwiches


Find the recipe here!

~Posted by Karen

Wednesday, August 31, 2011

Daring Bakers' Challenge: Candylicious

 The August 2011 Daring Bakers’ Challenge was hosted by Lisa of Parsley, Sage,
Desserts and Line Drive and Mandy of What the Fruitcake?!.  These two sugar mavens challenged us to make sinfully delicious candies!  This was a special challenge for the Daring Bakers because the good folks at
http://www.chocoley.com offered an amazing prize for the winner of the most creative and delicious candy!


I loved this challenge!  There were so many options, I had a hard time deciding which types of candy I wanted to make.  I decided to make salt water taffy, since it is a classic summer candy.  I also made chocolate truffles, flavored with orange zest.  Both recipes were very simple, and I'm planning on experimenting with more candy recipes in the future!

Salt Water Taffy

Bring sugar, corn starch, corn syrup, salt, butter and water to a boil and cook until the mixture reaches 256 degrees F

Stir in mint extract and food coloring and pour mixture into heat-proof pan

Pull warm taffy for about 20 minutes

Cut taffy into bite-sized pieces

Wrap finished taffy in wax paper


Salt Water Taffy

2 cups sugar
2 tablespoons cornstarch
1 cup light corn syrup
3/4 cup water
2 tablespoons butter
1 tsp salt
1 tablespoon mint extract
Food coloring (optional)

1. Lightly butter a heat safe dish and spatula.

2. Sift together the sugar and cornstarch in a saucepan.  Add the corn syrup, water, salt and butter.  Heat on the stove top over medium heat, stirring until sugar dissolves.  Using a candy thermometer, bring the mixture to 256 degrees F.

3. Remove from heat and stir in food coloring and mint extract.  Pour into prepared heat safe dish.

4. Once the candy is cool enough to handle, grease hands, and pull the candy with your hands.  Pull the candy out into a rope of at least 12 inches, then fold in half and repeat.  Continue pulling candy for about 20 minutes, until glossy.  To finish, pull candy into a long rope and cut off bite-sized pieces with greased scissors.  Wrap in wax paper.

Orange Flavored Truffles

Pour warm cream and orange zest over chocolate to melt.

Beat mixture until smooth and refrigerate

Scoop out small truffles and dust with cocoa powder

Enjoy!


Orange Flavored Truffles

3/4 cup heavy cream
Zest of one orange
12 ounces dark chocolate, chopped
1 tsp vanilla extract
Cocoa powder, for dusting

1. Bring heavy cream and orange zest to a simmer over low heat.  Pour warm cream over dark chocolate, and allow to stand for 10 minutes.  Add the vanilla and stir until chocolate is completely melted and smooth. 

2. Allow chocolate to cool at room temperature for one hour before beating it until it is thick.  Refrigerate chocolate for 2 hours.

3. Use a melon baller or cookie-dough scoop to scoop out small balls of the refrigerated chocolate.  Roll the truffles in cocoa powder to finish and store in refrigerator.


Taffy recipe was adapted from the recipe found at http://vanillaandlace.blogspot.com/2010/05/salt-water-taffy.html

Truffle recipe adapted from Tyler Florence's Dark Chocolate Truffles, found at http://www.foodnetwork.com/recipes/tyler-florence/dark-chocolate-truffles-recipe2/index.html

-Posted by Jennifer


Monday, August 15, 2011

Coconut Cream Pie


Coconut Cream Pie is one of my dad's favorites.  I don't like coconut, so I had never made one before.  After several nights of hearing him wish for a slice of coconut cream pie for dessert, I decided to surprise him with one.  It was definitely a hit!

Bake your pie crust


Make the filling


Make the meringue topping


Sprinkle with coconut and bake


Coconut Cream Pie

¾ cup sugar
¼ cup cornstarch
1/8 teaspoon salt
3 cups milk
3 egg yolks, beaten
¾ cup flaked coconut, divided
1-½  Tablespoons butter or margarine
1 teaspoon vanilla extract
1 9-inch baked pie crust
3 egg whites, at room temperature
¼ teaspoon plus 1/8 teaspoon cream of tartar
¼ cup plus 2 Tablespoons sugar

  1. Combine the sugar, cornstarch, and salt in a saucepan.  In a medium bowl, combine the milk and beaten egg yolks.  Gradually stir the milk/egg mixture into the saucepan.  Stirring constantly, place over medium heat until it is boiling and thickened, then cook, stirring constantly for 1 more minute.  Take off the heat and stir in ½ cup coconut, butter, and the vanilla; pour into the baked pastry shell, then immediately cover the filling with waxed paper.
  2. Beat egg whites and cream of tartar on high for 1 minute with an electric mixer.  Begin gradually adding the sugar, 1 Tablespoon at a time.  Beat for 2 to 4 minutes, or until stiff peaks form and the sugar has dissolved.  Remove the waxed paper and spread the meringue over the filling (which should still be hot), spreading it all the way to the edges of the pan.   Sprinkle with ¼ cup coconut.  Bake at 350 degrees until golden brown, about 12 to 15 minutes.  Cool, then serve.

Makes one 9-inch pie

Adapted from Southern Living 1984 Annual Recipes


~Posted by Karen