Wednesday, December 30, 2015

December 2015 Daring Bakers' Challenge: Gateaux Pithiviers

For the month of December, Kat challenged us to make Gateaux Pithiviers.


I had made Gateaux Pithiviers in the past, but always using frozen puff pastry. This challenge required that I make puff pastry from scratch, which is time consuming, but not difficult. It was well worth the extra effort. The resulting pastry was rich, buttery, and flaky, while the filling was sweet without being cloying. This recipe reminds me of an almond filled croissant, and makes a delicious dessert or breakfast pastry!


-Recipe available at: http://www.thedaringkitchen.com/recipe/gateaux-pithiviers
-Posted by Jennifer

Friday, November 27, 2015

November 2015 Daring Bakers' Challenge: Apple Cheesecake Crumble Pie

For the month of November, Krista and Nicole of "Two Cups of Sugar" challenged us to make our own version of cheesecake crumble pie.


For this challenge I decided to make an apple cheesecake pie, which was a perfect way to celebrate the end of fall and use up some of the local apples in my refrigerator. I enjoyed the pie, which tasted like a cross between apple crumble pie and cheesecake, and will definitely make it again with different fruit combinations.


Apple Cheesecake Crumble Pie
Makes one 9-inch deep dish pie

Crust
1 1/4 cups all-purpose flour
1/2 teaspoon salt
6 tablespoons cold unsalted butter, diced
2 tablespoons cold vegetable shortening, diced

Pie Filling
16 oz cream cheese, room temperature
3/4 cup sugar
1/2 teaspoon lemon zest
1/4 teaspoon vanilla extract
2 large eggs
1 large egg yolk
1/4 cup heavy cream
1 apple, peeled, cored, and cut into thin slices
1/2 teaspoon cinnamon

Crumble Topping
1 cup all-purpose flour
1/2 cup rolled oats
1/2 cup sugar
3/4 cup light brown sugar
1/2 teaspoon cinnamon
1/4 teaspoon salt
1/2 cup cold unsalted butter, diced

1. Prepare crust: Place flour and salt in a food processor, and pulse to combine. Add butter and vegetable shortening, and pulse until mixture appears coarse and butter is pea-sized. Add about 3 tablespoons of ice-cold water, and pulse mixture until dough comes together. Add water, one teaspoon at a time, if needed. Once dough comes together, form into a disk and wrap in plastic wrap. Refrigerate for at least one hour.

2. Prepare cheesecake filling: In a large bowl, beat the cream cheese until creamy. Slowly beat in the sugar and mix until smooth, about 2 minutes. Beat in lemon zest and vanilla, then beat in eggs one at a time, scraping down the side of the bowl to make sure all ingredients are evenly incorporated. Beat in heavy cream. Fold in the apple slices and cinnamon. 

3. Make crumble topping: In a medium-sized bowl, stir together dry ingredients. Use hands to crumble in the butter, until it forms a coarse mixture.

4. Preheat oven to 425 F. Remove pie dough from refrigerator, and roll out into a 12-inch circle on a lightly floured work surface. Carefully transfer dough to 9-inch deep dish pie dish. Prick the bottom of the crust several times with a fork. Fill crust with pie weights or dried beans, and bake for 9 minutes. Remove weights or beans and bake for an additional 3 minutes, until slightly browned. Remove crust from oven.

5. Increase oven temperature to 475 F. Pour the cheesecake filling into pre-baked pie crust. Bake for 15 minutes at 475 F. Remove from oven and cover with crumble topping.

6. Reduce oven temperature to 200 F. Return pie to oven, and continue baking for 1 hour. After one hour, turn off oven and leave oven door cracked open. Allow pie to cool in oven.

7. Refrigerate pie for at least 6 hours before serving.

-Adapted from recipe available at http://www.thedaringkitchen.com/recipe/cheesecake-crumble-pie
-Posted by Jennifer

Thursday, October 29, 2015

October 2015 Daring Bakers' Challenge: Peanut Butter and Jelly Macarons

Blog-checking lines: For the month of October, we got to take on one of many bakers' deepest, darkest kitchen nightmares: macarons. Our talented bakers Korena from Korena in the Kitchen, and Rachael from pizzarossa made the intimidating task of mastering these French beauties a breeze.


I've blogged about French macarons before, so instead of making one the the traditional variations of macarons, I decided to challenge myself to something different. I recently bought a delicious locally made raspberry jam, and wanted to make some sort of macaron in which I could use the jam as a filling. I settled on making a completely nontraditional take on macarons, using ground peanuts in place of some of the almond flour to create a "PB & J" flavored macaron. The result was slightly richer than the more traditional recipes, but I enjoyed the challenge and the resulting macarons!


PB & J Macarons
Makes about 15 macarons

1/4 cup unsalted roasted peanuts
1/4 cup almond flour
1 cup confectioner's sugar
2 large egg whites, at room temperature
3 tablespoons granulated sugar
1/2 teaspoon vanilla extract
1/4 cup raspberry jam

1. Line 2 baking sheets with parchment paper. Trace thirty 1 1/2 inch circles on the paper, separating circles by about 1 1/2 inches. Flip paper over, so that circles can still be seen on parchment paper.

2. Grind peanuts in a food processor to form a fine powder. Add almond flour and confectioner's sugar and pulse to combine. Sift mixture to remove any large pieces.

3. Beat egg whites in a large bowl until foamy. Gradually beat in the granulated sugar. Continue beating until soft peaks form, then beat in vanilla extract. Continue beating until stiff peaks form. Carefully fold in peanut mixture until combined.

4. Preheat oven to 340 F.

5. Use a pastry bag to pipe the batter into the traced circles on the parchment paper. Tap baking sheets against counter to remove any air bubbles. Allow macarons to sit at room temperature for 15-30 minutes while oven preheats.

6. Bake macarons at 340 F for about 13-15 minutes, until slightly crisp. Macarons should lift easily off of parchment paper when done.

7. Allow macarons to cool to room temperature on a cooling rack. Carefully remove from parchment paper. Spread a thin layer of jam on the flat side of one macaron, and top with another macaron. Repeat with the remaining macarons. Enjoy!

-Posted by Jennifer
-Adapted from recipe available at http://www.foodnetwork.com/recipes/food-network-kitchens/peanut-butter-jam-macaroons-recipe.html
-Original challenge available at http://www.thedaringkitchen.com/recipe/macarons

Sunday, September 27, 2015

September 2015 Daring Bakers' Challenge: Irish Soda Bread

For the month of September, Meredith from the Poco Loco Olsons challenged us to experiment with soda bread.


I chose to make the traditional Irish Country Bread recipe provided for the challenge. This recipe was very simple, and the resulting crusty bread went nicely with soup.


Irish Country Bread

2 1/2 cups buttermilk
2 cups whole wheat flour
4 cups all-purpose flour
2 tsp baking soda
1 tsp salt

1. Preheat oven to 450 F and line a baking sheet with parchment paper.

2. In a large bowl, stir together the flours, baking soda, and salt. 

3. Create a well in the flour mixture, and pour in buttermilk.

4. Mix dough well, until flour is fully incorporated. 

5. Place dough on lined baking sheet and pat into a 1-inch thick circle.

6. Use fingertips to create dimples on top of dough.

7. Bake at 450 F for 30 minutes, then reduce heat to 400 F. Remove baking sheet from under dough, so parchment paper is directly on the oven rack. Continue baking at 400 F for about 10 more minutes, until golden brown.

8. Remove from oven and allow to cool.

-Posted by Jennifer

-Adapted from original recipe at http://www.thedaringkitchen.com/recipe/irish-soda-bread

Thursday, August 27, 2015

August 2015 Daring Bakers' Challenge: Gluten-Free Seed and Nut Loaf

For the August challenge, Susan from The Kiwi Cook dared us to make Seed & Nut Loaf- a super healthy and gluten-free alternative to standard wheat-based bread.


While I would have liked to try the original challenge recipe for a seed and nut loaf, that recipe called for psyllium seed husks to hold the loaf together. I recently moved to a small town, where it is difficult to find certain ingredients, and I did not have any luck looking for psyllium. Therefore, I made an alternate recipe for a seed and nut "flatbread", which is also gluten-free and packed with protein and nutrients. The bread is very quick and easy to throw together, and makes a very filling breakfast or snack. I personally found the bread to be bland on its own, but was much tastier when topped with butter and honey or hummus.

Carrot Seed and Nut Flatbread
Makes about 8 servings

150 g carrots, grated
2 tablespoons olive oil
1 packet active-dried yeast
Pinch of salt
50 g almonds, ground
50 g hazelnuts, ground
50 g sesame seeds
50 g flax seeds
50 g sunflower seeds
50 g pumpkin seeds
2 teaspoons za'atar spice mixture
100 mL warm water

1. Preheat oven to 340 F.

2. Mix together carrots, olive oil, yeast, salt, almonds, hazelnuts, and za'atar in a large bowl.

3. Lightly toast the sesame, flax, sunflower, and pumpkin seeds. Allow to cool, and then grind together in a food processor. 

4. Add the ground seeds to the bowl with the other ingredients. Add water and mix together with your hands. 

5. Line a baking sheet with parchment paper, and spread the mixture evenly in the pan. Cover pan with a towel, and allow to rest for 15 minutes.

6. Bake at 340 F for 25-30 minutes. The edges should be slightly brown and crisp; however, the center to the bread should still be springy.

7. Allow to cool and cut into pieces. Top with butter and honey, or the topping of your choice.

-Adapted from the recipe available at   http://www.whatsforlunchhoney.net/2015/03/flourless-carrot-multi-seed-and-nut.html

-Posted by Jennifer

Monday, July 27, 2015

July 2015 Daring Bakers' Challenge: Sweet "Yafawi Sfeeha"

Blog Checking Lines: The July Daring Bakers' Challenge was brought to us by Manal from Manal's Bites. She introduced us to an authentic Palestinian dish from Jaffa that is served as a main meal along with a bowl of soup or a salad. The "Yafawi Sfeeha" or also known as "Milwayeh" which means twisted, is crispy yet tender and full of flavor.


This challenge was the first time I had heard of Yafawi Sfeeha, which are traditionally savory meat-filled pastries. I chose to make a sweet  walnut-filled variation, since I am a vegetarian. The rich flavors of cinnamon in the filling balance nicely with the delicate floral flavors of the orange blossom and rose waters, and I found that the dough was very easy to work with.

Make dough and divide into golf ball-size pieces to rest.


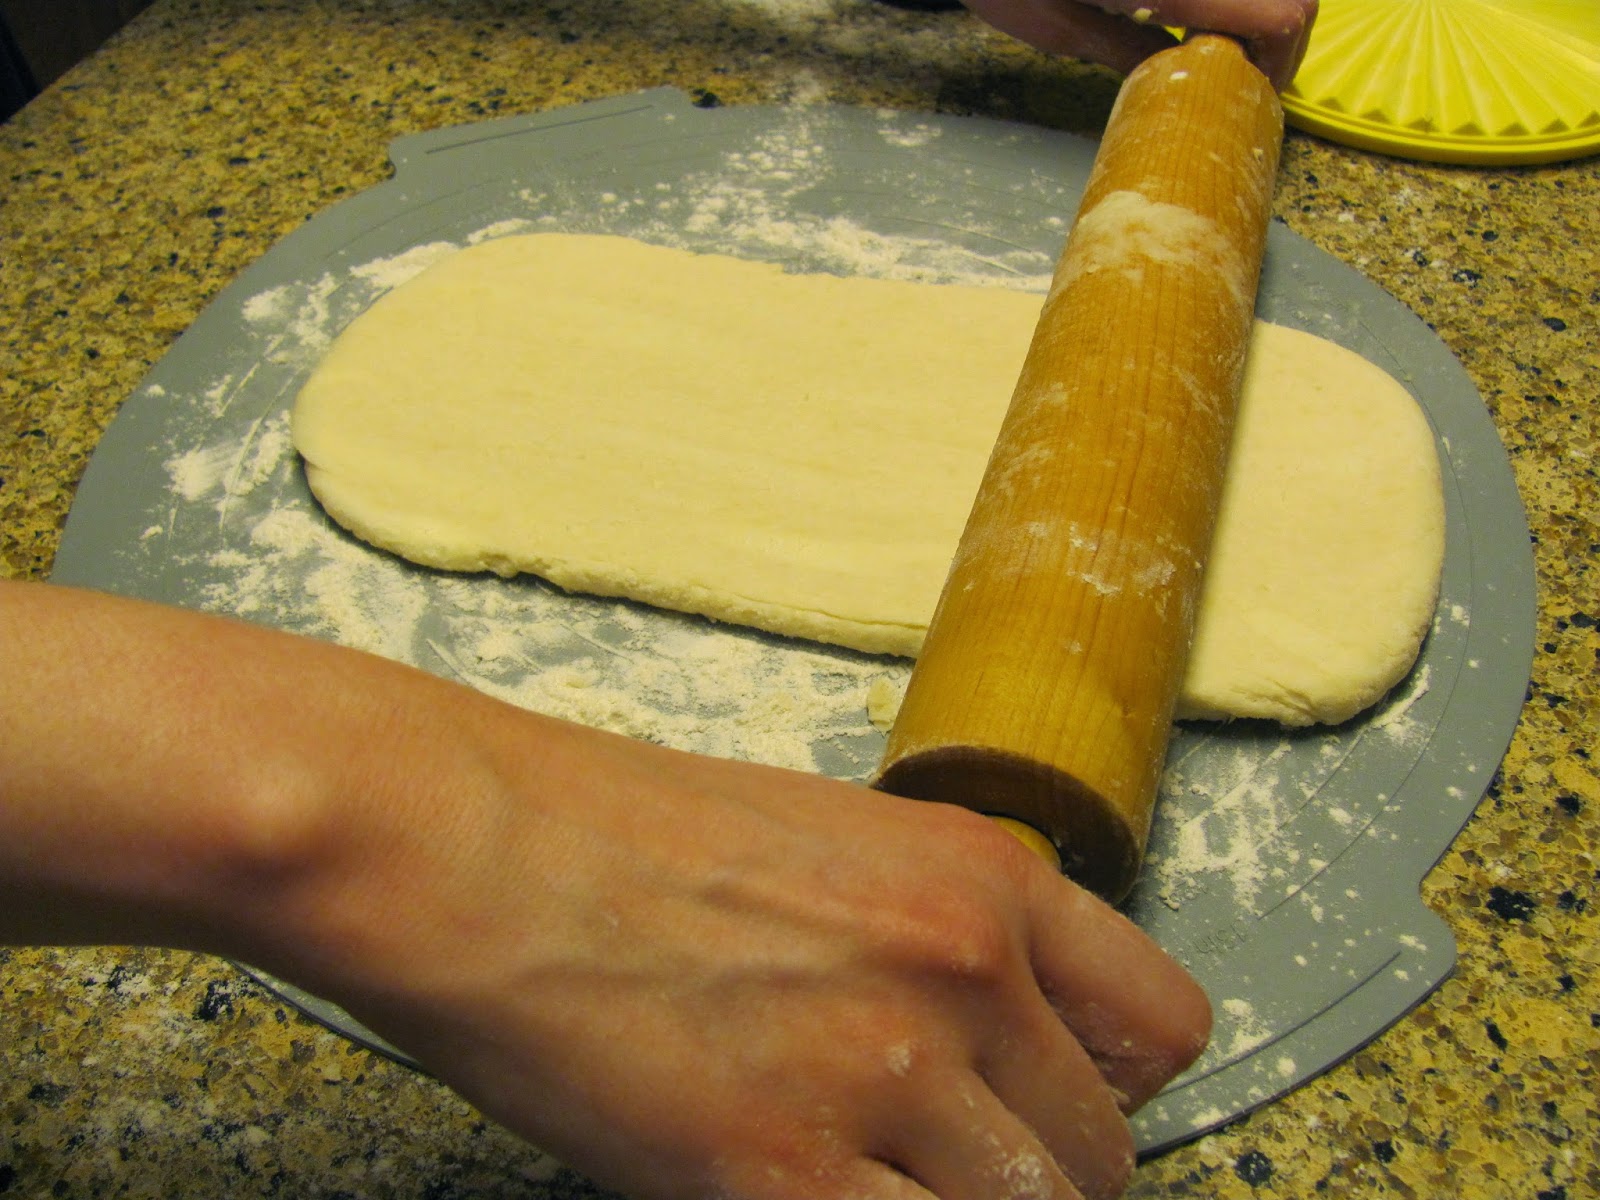
Stretch dough into a circle as thinly as possible, and fold each side into the center.

Spread filling along center of dough.

Roll dough into a rope, with filling in the center.

Roll each rope of dough into a spiral shape.

Bake and pour sugar syrup on top of pastries.


Sweet Walnut-Filled "Yafawi Sfeeha"
Makes about 16 pastries

Dough
3 cups all-purpose flour
1 teaspoon salt
1 tablespoon sugar
3 tablespoons whole milk, warm
3 tablespoons vegetable oil
About 3/4 cup warm water
Melted ghee, to stretch dough

Filling
2 cups walnuts, chopped
1 teaspoon cinnamon
3 tablespoons powdered sugar
1/8 teaspoon nutmeg
1/2 tablespoon orange blossom water
1/2 tablespoon rose water

Syrup
1 cup sugar
3/4 cup water
Juice of half a lemon
1 teaspoon orange blossom water

1. Make dough: Mix together flour, salt, sugar, milk, and vegetable oil. Gradually add warm water until a sticky dough forms. Knead for about 12 minutes, until dough becomes less sticky and easier to work with. Divide dough into about 16 balls. Place on a greased baking sheet and brush with melted ghee. Cover dough balls and allow to rest at room temperature for a few hours.

2. Make filling: Mix together walnuts, cinnamon, powdered sugar, nutmeg, orange blossom water, and rose water.

3. Make sugar syrup: Heat sugar and water in a pot over high heat, without stirring. Once syrup begins to boil, stir with a wooden spoon until all sugar has dissolved. Add lemon juice to syrup and continue boiling for 2 minutes. Allow syrup to cool, and add orange blossom water.

4. Preheat oven to 400 F. Brush your work surface with ghee. Take each ball of dough and stretch it as thinly as possible into a circle. Fold each side of the dough to the middle.

5. Spread the walnut filling in a thin line down the middle of the folded dough. Roll dough into a rope, with the filling contained in the center of the rope.

6. Roll the rope of dough into a spiral shape. Place onto greased baking sheet, and brush with more melted ghee.

7. Bake pastry at 400 F for about 20 minutes, until golden brown. Remove from oven and pour syrup over warm pastries.

-Adapted from the recipe available at http://www.thedaringkitchen.com/recipe/yafawi-sfeeha.

-Posted by Jennifer


Wednesday, May 27, 2015

May 2015 Daring Bakers' Challenge: Lamingtons

Blog checking lines: For the May challenge Marcellina from Marcellina in Cucina dared us to make Lamingtons. An Australian delicacy that is as tasty as it is elegant.


While I had heard of Lamingtons before, this was my first time trying the classic Australian dessert. I chose to make the traditional Lamington- a vanilla sponge cake dipped in chocolate glaze and rolled in coconut flakes. The delicate sponge balanced perfectly with the rich chocolate and coconut flavors and kept the dessert from being too sweet. I definitely recommend baking the cake the day before preparing the Lamingtons, to prevent the cake from crumbling too much when rolling in the chocolate glaze!

Lamingtons
Makes 16 individual cakes

6 large eggs, room temperature
3/4 cup sugar
1/4 tsp salt
1 tsp vanilla extract
1 1/3 cup cake flour
2 1/2 oz unsalted butter, melted
3 1/4 cups confectioner's sugar
1/3 cup cocoa powder
1 tbsp unsalted butter, melted
1/2-3/4 cups whole milk
3 cups shredded coconut

1. Preheat oven to 350 F. Prepare a 9-inch square cake pan by buttering and lining with parchment paper.

2. Beat together eggs, sugar, and salt for 10 minutes. Stir in vanilla extract.

3. Sift cake flour over batter, and carefully fold in flour with a whisk. Fold in melted butter until you can not see any streaks of butter.

4. Pour batter into prepared cake pan and bake for 30 minutes. Remove from oven and allow to cool completely.

5. After cake has cooled completely, remove from pan and cut into 16 squares.

6. Prepare chocolate glaze: In a large bowl, combine confectioner's sugar, cocoa powder, butter and 1/2 cup milk. Place bowl over a pot of hot water, and whisk until smooth. Add more milk to thin icing, as needed.

7. Assemble Lamingtons by dipping each piece of cake into chocolate glaze, then roll in shredded coconut. Allow cakes to set on a wire rack for about 2 hours before serving.

-Cake recipe adapted from David Lebovitz's Lamington recipe available at http://www.davidlebovitz.com/2011/11/lamingtons-recipe-chocolate-coconut-cake/. Chocolate glaze recipe from thedaringkitchen.com/recipe/lamingtons.

-Posted by Jennifer

Monday, April 27, 2015

April 2015 Daring Bakers' Challenge: Focaccia

For the month of April, Rachael from pizzarossa and Sawsan of Chef in Disguise took us on a trip to Italy. They challenged us to try our hands at making focaccia from scratch.


It's been years since I've made focaccia, so I was happy that this challenge inspired me to start baking it again. I went with a basic focaccia, topped with olive oil, rosemary, and sea salt. I found the recipe to be quick enough to make on a weeknight, and simple yet delicious!

Make dough and allow to rise. Punch down and pat into rectangle. Brush generously with olive oil.

Add desired toppings.

Bake and enjoy!


Basic Focaccia
Makes one loaf (about 8 slices)


1 1/4 cups milk, slightly warm (110 F)
1 tsp sugar
1 tbsp active dry yeast
2 3/4 cup all-purpose flour
1 tsp salt
1 tsp garlic powder
1/2 tsp dried basil
1 tsp dried oregano
Pinch of black pepper
1 tbsp vegetable oil

To Top:
Sea salt
Fresh rosemary
Olive oil

1. Stir yeast and sugar into warm milk and set aside until bubbly.

2. In a large bowl, mix flour, salt, garlic powder, basil, oregano, and black pepper. Stir in vegetable oil, then add the milk-yeast mixture. Mix with a wooden spoon until dough comes together.

3. Turn dough out onto lightly-floured surface, and knead for 10 minutes. Place dough in a lightly oiled bowl, and cover with a damp towel. Allow dough to rise in a warm place until doubled in size, about 45 minutes.

4. Preheat oven to 450 F. Grease a baking sheet.

5. When dough has doubled in size, punch down and transfer to baking sheet. Pat dough into a 1/2 inch thick rectangle.

6. Brush olive oil over dough and add toppings (I added sea salt and rosemary). Allow dough to rest for 10-15 minutes.

7. Bake focaccia at 450 F for about 15 minutes, until golden brown.

-Adapted from recipe available at http://thedaringkitchen.com/recipe/focaccia

-Posted by Jennifer

Wednesday, April 1, 2015

March 2015 Daring Bakers' Challenge: Tarte Tatin

For the March Daring Bakers' Challenge, Korena from Korena in the Kitchen taught us that some treats are best enjoyed upside down. She challenged us to make a tarte tatin from scratch.


I'm posting this a little late, as I was hoping to have a chance to reattempt the challenge; however, I haven't found the time yet. I was excited to see tarte tatin as the challenge recipe this month, since when I first tried to bake it years ago, it ended up falling apart while baking. This time, the tart held together; however, the caramel was slightly burnt. It wasn't a complete failure, though- the tart was still delicious with the burnt parts scraped off! I plan to bake this again in the near future, and reduce the stove top cooking time a bit. The rough puff pastry recipe was surprisingly simple, and something I will definitely plan on making in the future in place of the frozen puff pastry I often use.

Roll pastry dough into 10 inch rectangle, and fold in thirds.

Turn dough a quarter turn, roll into another 10 inch rectangle, and repeat folds. Repeat process for a total of 5 turns.

Prepare caramel on stove top.

Arrange apples in caramel, and place pastry on top. Bake at 375 F for about 30 minutes.

Allow to cool slightly before flipping tart onto a serving platter. Enjoy while warm!

Tarte Tatin
Makes one 9 inch tart

Rough Puff Pastry
1 cup all-purpose flour
2/3 cup unsalted butter, cold and cut into small cubes
1/4 tsp salt
1/4 cup ice water

Tarte Tatin
7-8 baking apples (I used Granny Smith)
Juice of half a lemon
6 tbsp unsalted butter
1 1/3 cup granulated sugar
Pinch of salt

1. Prepare pastry dough: Combine flour and salt in medium bowl. Cut butter into flour with a pastry blender until mixture is crumbly. Make a well in the center of the mixture, and pour in water. Use a fork to toss the mixture with the water until dough starts to come together. Turn dough out onto lightly floured work surface, and gently knead a few times to bring dough together in to a square. Use a rolling pin to roll out dough into a 10 inch rectangle. Fold the bottom third of the dough up and the top third of the dough down, as if you were folding a letter. Turn the dough a quarter turn, and repeat process for a total of 5 turns. After the fifth fold, wrap dough in plastic and refrigerate for at least one hour, or up to overnight.

2. Peel and quarter apples, removing the cores. In a large bowl, toss apple quarters with lemon juice and 1/3 cup sugar. Set aside for 15 minutes, then drain off excess liquid.

3. Preheat oven to 375 F. In a 9-inch oven-proof saucepan, preferably cast iron, melt butter over medium heat, and add the remaining cup of sugar. Whisk sugar and butter together until a smooth caramel forms. Remove from heat.

4. Add apple quarters to pan with caramel, with round sides down. Cook over medium heat until apples start to shrink enough to all fit in a single layer, about 5-10 minutes. Remove from heat and use a wooden spoon to arrange apple quarters in concentric circles within the pan.

5. Once caramel stops steaming, roll out rough pastry dough into a 10 inch circle. Carefully place dough on top of the apple filling, and use a spoon to push the sides of the dough between the apples and the sides of the saucepan. Cut a few steam holes in dough. 

6. Place saucepan on a baking sheet, and bake at 375 F for 30-35 minutes, until pastry is golden brown. It may be necessary to increase the heat to 400 F  for the final 5 minutes of baking, if pastry is not browning as desired. Remove from oven and allow to cool until caramel stops bubbling.

7. Using oven mitts, place serving platter on top of the pastry, and quickly invert tart onto platter. Be careful, as sugar is very hot!

8. Serve warm.


-Posted by Jennifer


Tuesday, January 27, 2015

January 2015 Daring Bakers' Challenge: Esterhazy Torte

For the month of January, Jelena from A Kingdom for a Cake invited us to start this year with a dreamy celebration cake. She challenged us to make the Esterhazy cake, aka the Hungarian Dream. What better way to start the new year than with a sweet dream?


I love it when the Daring Kitchen introduces me to something completely new, and this was definitely the case with the Esterhazy Torte. While the traditional recipe calls for hazelnuts, I opted to use almonds, which are a common substitution in this cake in parts of Austria. While the cake is a bit time consuming to prepare, it is absolutely delicious, and the spider-web design on top is sure to impress guests!


Esterhazy Torte
Makes one 9-inch torte

Cake
8 egg whites, at room temperature
2 cups confectioner's sugar
zest of 1 lemon
pinch of cinnamon
150 g almond flour
1/3 cup all-purpose flour
butter, to grease parchment paper

Filling
14 tbsp unsalted butter, at room temperature
1 cup confectioner's sugar
2 cups whole milk
5.1 oz instant vanilla pudding mix
1 tsp kirsch

Icing
2 cups confectioner's sugar
juice of 1 lemon
3-4 tbsp hot water
1 tsp cocoa powder
toasted almonds, to finish cake

1. Preheat oven to 350 F.
2. Beat together egg whites with 2/3 of the confectioner's sugar, until mixture holds soft peaks. Add the lemon zest, cinnamon, and remaining sugar and continue beating until mixture holds stiff peaks. Fold in almond flour and all-purpose flour carefully, trying to prevent the egg whites from losing volume. 
3. Draw five 9-inch circles on pieces of parchment paper, and lightly butter the paper. Spread thin layers of the batter onto the circles.
4. Bake each layer at 350 F for 10-12 minutes, until lightly browned. Use a spatula to carefully loosen each layer from the parchment paper and allow to cool.
5. Prepare cream filling by beating the butter and sugar together until fluffy. Whisk together the milk, instant pudding mix, and kirsch for about 2 minutes. Whisk the butter mixture into the pudding mixture until smooth.
6. Assemble cake by layering the cake layers with the cream filling. Leave the top of the cake bare, but save enough cream filling to spread onto the sides of the cake at the end.
7. Prepare icing by whisking together sugar, lemon juice, and hot water until smooth and easy to spread. Set aside a small amount of icing in a separate bowl, and whisk in cocoa powder until smooth.
8. To decorate the cake, place the chocolate icing in a pastry bag. The decoration must  be done quickly, before the icing sets. Carefully and quickly spread white icing onto top of cake. Use a pastry bag to pipe 4 concentric circles of the chocolate icing onto the cake. Use a toothpick or knife to draw lines from the center of the circle to the edge and back, alternating directions to create the web design.
9. Spread remaining cream filling around the sides of the cake, and add toasted almonds around the sides.
10. Enjoy! 


-Cake recipe adapted from http://www.wien.info/en/shopping-wining-dining/viennese-cuisine/recipes/esterhazytorte. Filling and icing adapted from http://www.masalaherb.com/2012/08/esterhazy-torte.html.
-Posted by Jennifer